A Cardboard Bed for Hitty

Pizza Box!
We wanted to make a bed out of cardboard for Hitty, using materials and equipment that are already at hand, and not needing fancy equipment or materials. We used medium weight corrugated cardboard, a craft knife, and glue, four empty cotton reels, and some 1/4 inch wide ribbon. We used three kinds of glue: wood glue, hot melt glue and gluestick. You could get away with using just wood glue but some steps will take longer to dry!
Pizza boxes are a good weight but other medium weight cardboard can be used of course…
.
.

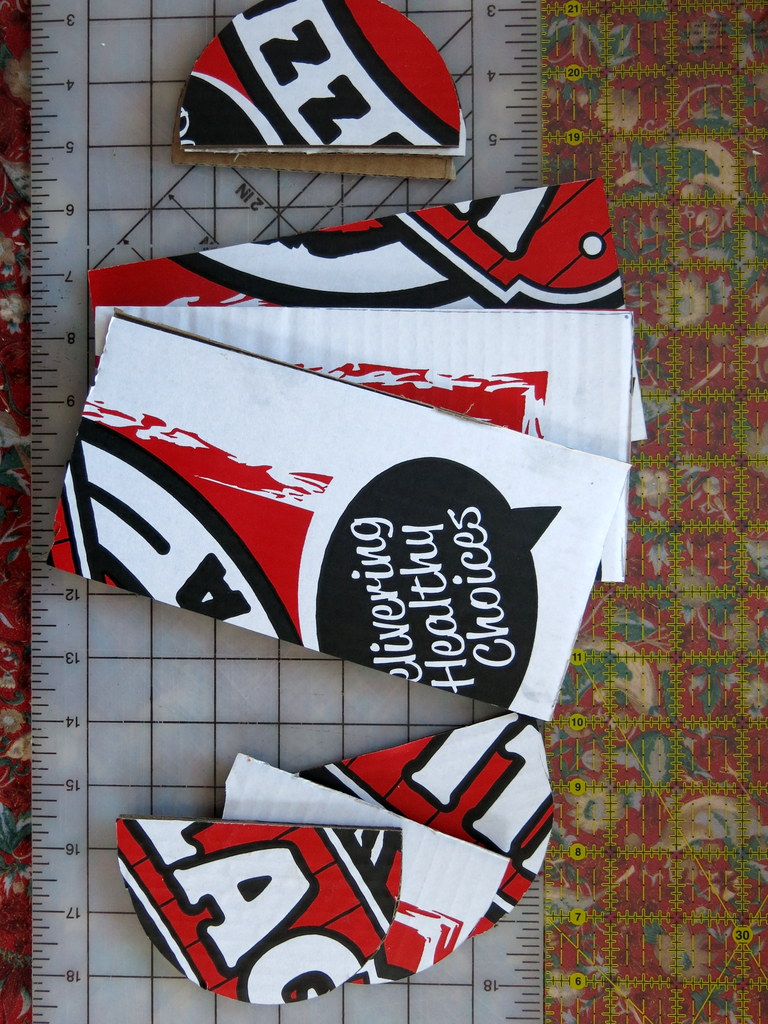
Cardboard Pieces
Our whole doll bed could be made out of the top of the pizza box.
.
.

templates
The base here is a 4 X 7 inch rectangle. You can change the length to 8 inches if your Hitty would like a slightly longer bed. The foot board is a half moon the same width as the base (4 inches). The headboard is the same shape as the foot board but a bit taller.
.
.
Three of Each
Cut three identical pieces for each element of the bed, making sure at least one of each set is oriented at 90 degrees crosswise from the others. This will make the final elements strong and less apt to warp.
.
.

Trim two
On the head board, cut a quarter inch strip off the bottom of two of the shapes, so you end up with two shorter pieces and one longer piece. Do the same for the foot board.
.
.

Two directions
Here are three foot-board pieces…the back one is a quarter-inch longer than the other two, and this longer one will be placed on the outside of the bed when you glue it all together. Place this longer one flat on your work surface and make a stack with the cross-channel one in the middle, and the other one on top. If you are you are using printed cardboard, try to make sure the outside surfaces are plain brown cardboard, putting the printing on the inside.
.
.
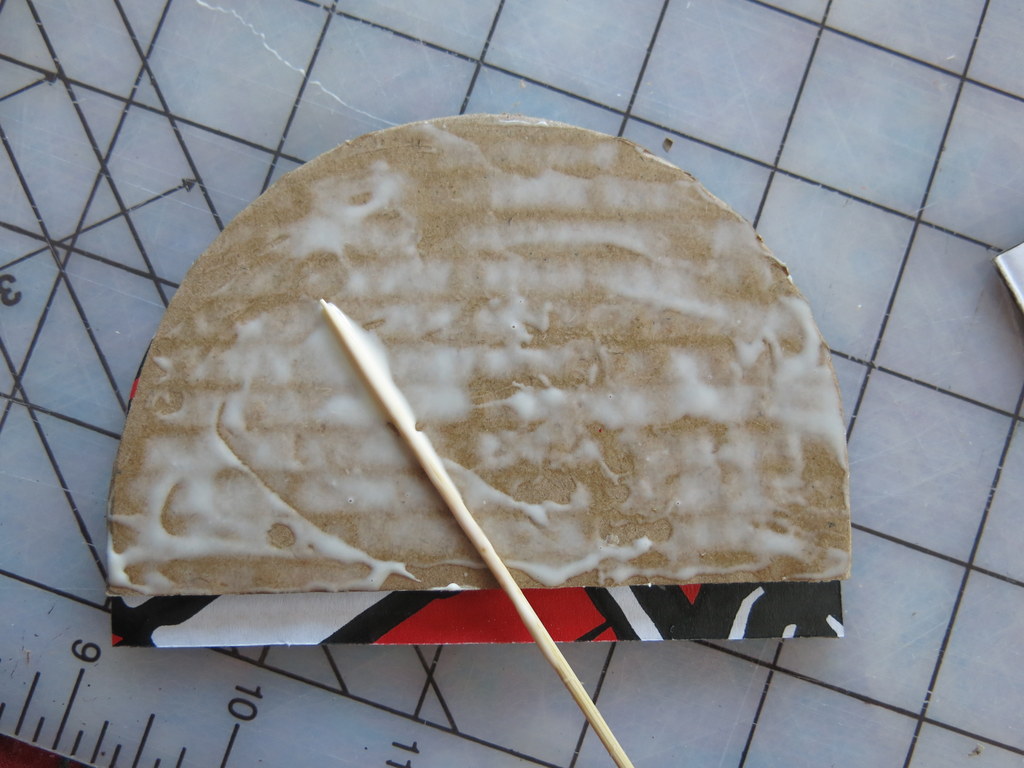
Glue
Glue the layers together with white glue or wood glue, making sure you leave the longer one with the extension sticking out the bottom on both the head and foot boards creating a notch.
The rectangular pieces for the base are glued together in a stack, again with the cross-wise piece in the middle layer and the printed sides in.
.
.

Weight (and wait!)
Press the pieces together until they are dry! Then trim with craft knife until all three pieces in each stack are exactly the same size, except for the extensions on the head and footboards.
.
.

Hot Melt Glue
Next attach the headboard, base, and footboard elements together with hot melt glue…
.
.
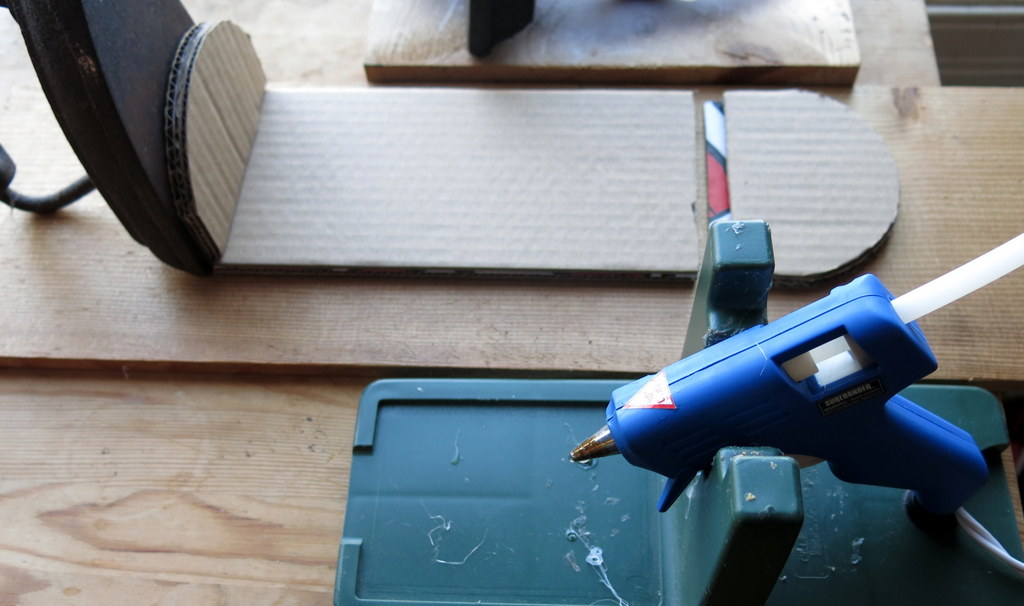
Glue ends to base
The 1/4 inch extensions on the head and footboards will go on the outside edge of the base, with the base slotting into the little notch you have created. Smear glue on all the contact edges so you get a nice strong bond, and hold in place a few moments for the hot glue to cool and set.
.
.

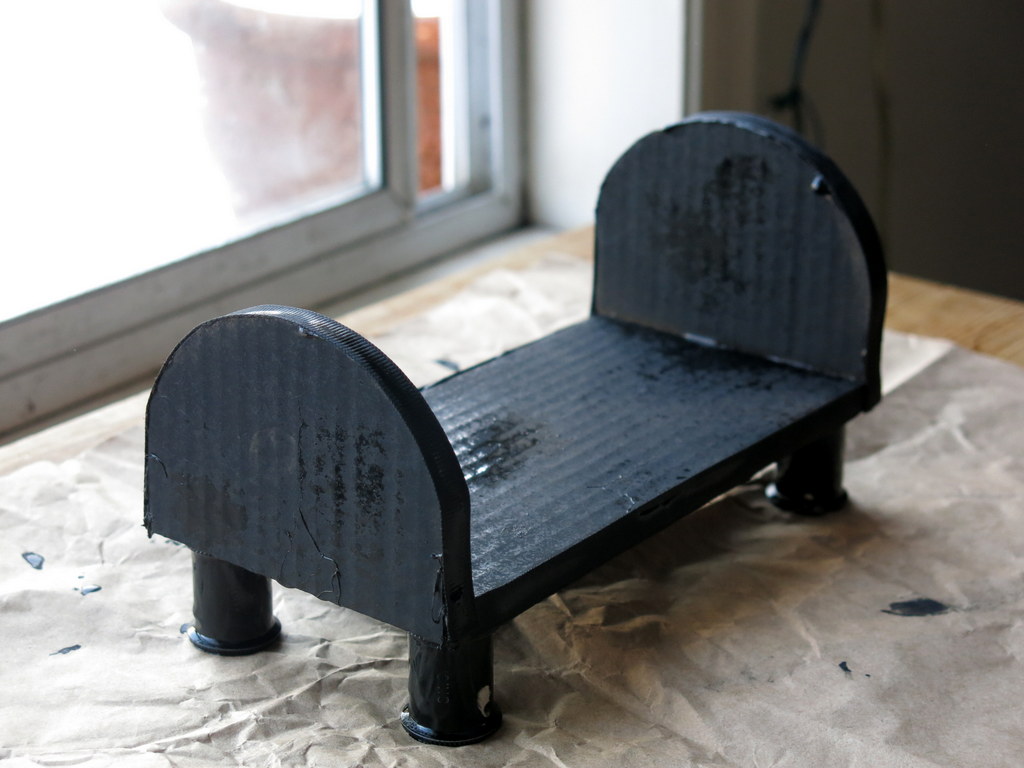
Cotton Reels
For legs, you can use anything that you have four identical pieces of – we used cotton reels and glued them in place with hot melt glue. But you could use corks; dowels or clothespegs sawn to the size you like, a stack of buttons, lego, bottle caps, film canisters, or you could laminate cardboard together. Just make sure that all four legs are the same length…trim, sand, or otherwise flatten if necessary.
.
.

Grosgrain Ribbon
We covered the raw edges of the cardboard with 1/4 inch grosgrain ribbon to neaten it…
.
.

Edge trim
…over the endboards too. We liked the texture of the grosgrain ribbon, but any flat ribbon can be used, or if you don’t have ribbon you can use a strip of paper. Trim and neaten the blobs of glue, the threads of ribbon and any fluffy bits of cardboard.
.
.
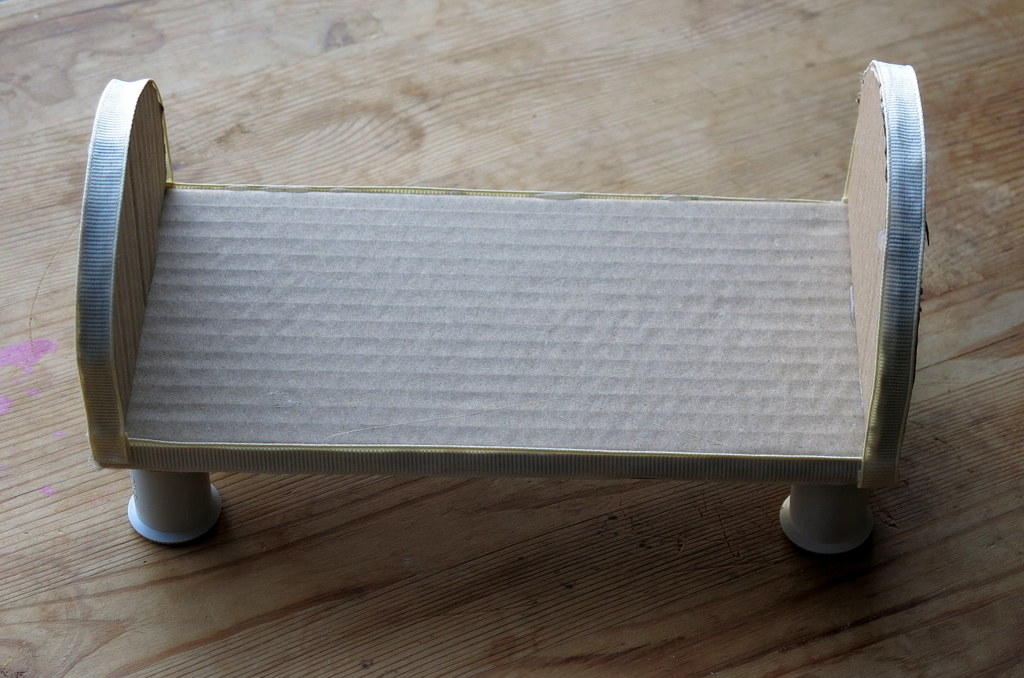
Complete Structure
All done but the decorating!
.
.
Spray Paint
It was a freezing cold day outside when we went to paint the bed, so the spray paint went on very globby and also every bit of excess hot melt glue showed up! Ugh. We had a bit of tidying up to do with scissors and craft knife. Probably better to do the trimming and tidying before you paint!
.
.
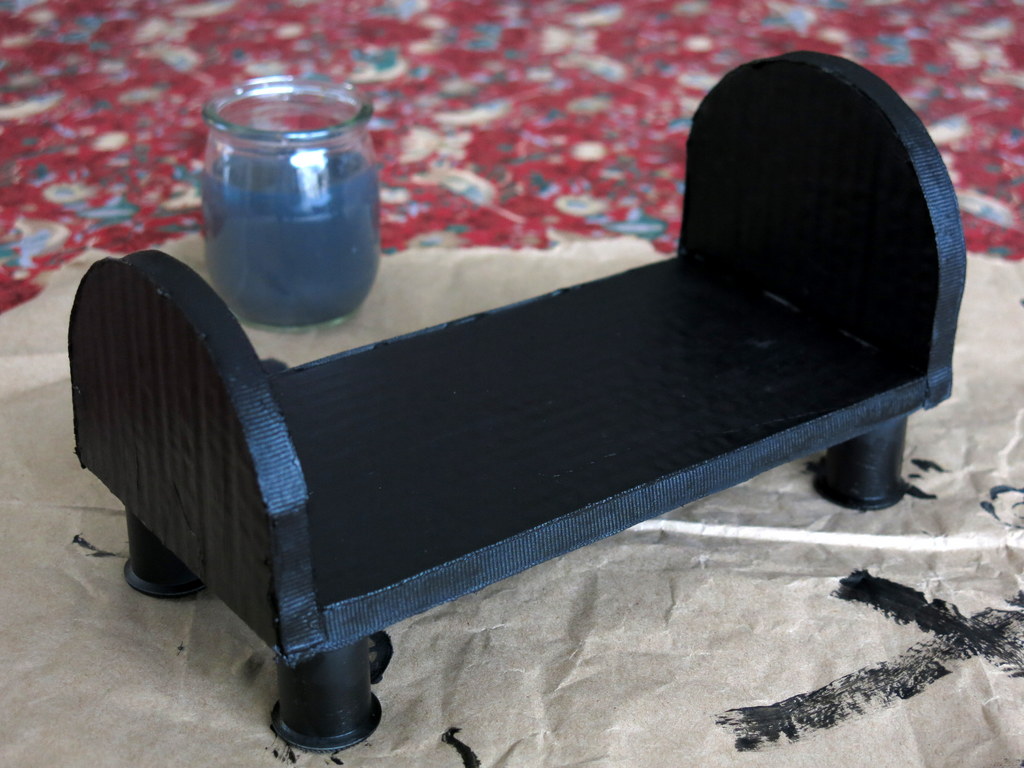
Acryllic Top Coat
It looked much better after tidying the bits up, and giving the whole bed a top coat of acrylic paint.
.
.

Paper shapes
A few shapes were cut out of paper and glued on with glue stick…
.
.
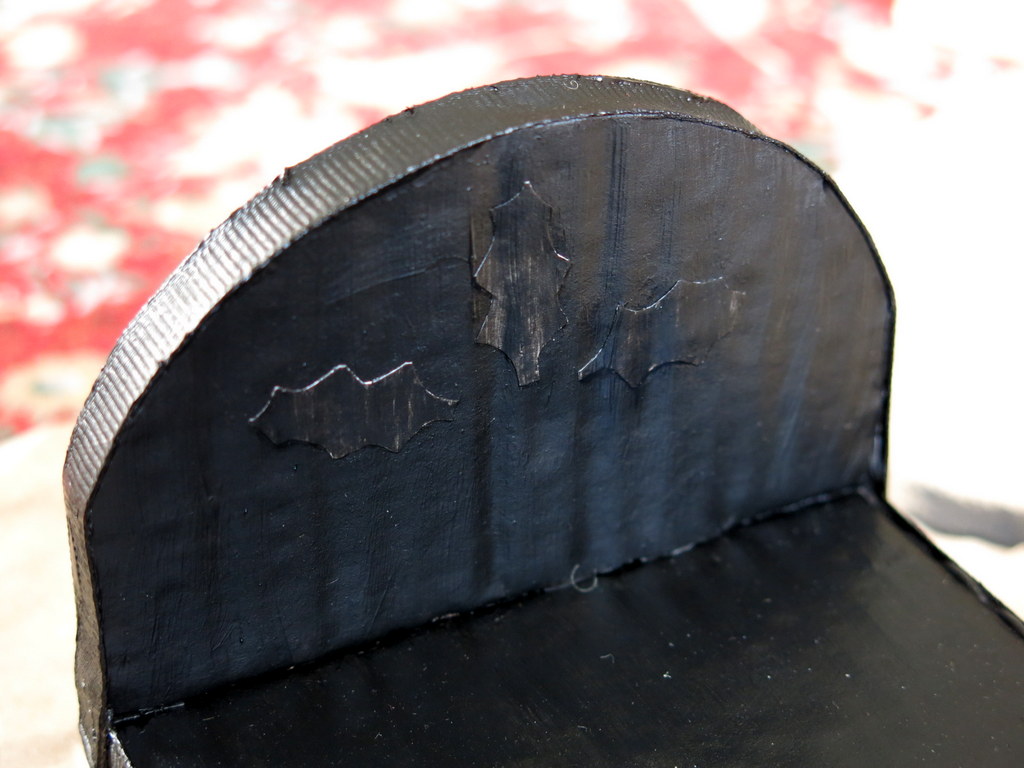
Glued and overpainted
…and overpainted with black to match the rest of the bed…
.
.

Gold Paint
…and trimmed with gold. You could decorate by sticking on a decal, or a pretty button or anything you like that is fairly flat, but you could go wild too – maybe glue on shells, photographs, silhouettes, decoupage…
.
.


Good morning Quimper Hitty Lady!
Who is to sleep in this sweet bed?
Is it for Holly?
You are very creative.
Our human used to make smaller furniture for her 1:16 scale dolls’ house when she was a child and she showed us a book she got for Christmas called Miss Violet’s Doll’s House, in which a paper doll named Violet and her human created a home filled with found and made objects. It is very interesting, though the house is perhaps a little bohemian for our taste.
Personally, I wish our human had stuck to making furniture, because the friendly farmer here says her latest Hitty carving effort looks like a creature that may, or may not have been found in a place called Roswell.
Now, I wish I hadn’t looked on-line to see what went on at Roswell as, if it is true, such a creature might be friendly, but equally might not… But we must be charitable and look for the good in her, how ever she turns out!
Best wishes, Mary N-Q-H xxx
Indeed yes, the wee bed is for Holly – how did you guess?
Furniture-making and repair is one of my favourite jobs to do in the Hitty Cupboard, and I’ve been trying to do projects that don’t require new and expensive materials and equipment, Also hope to encourage some of my Hitty friends that don’t have wood-working skills and expertise!
All dolls that I have ever made have to go through a “dread-full” stage! Dear little Rosy-girl will emerge…it’s a wonder what a bit of sanding and a nice paint job will do for a little wooden being!
I would never know that this special little bed was made from a pizza box lid. You continually amaze me. It’s so pretty.
A sweet Holly bed for a lucky little Holly wooden.
Young human is fond of the colour black! I thought the gold paint looked especially nice against black, and both she and Holly-dolly are absolutely delighted with the bed, I’m happy to say!
Decidedly and deservedly delightful! Thank you so much for another careful tutorial.
Thank you, and you are welcome! I had fun taking the most mundane objects and making something pretty!
an excellent tutorial. thank you for being so detailed and thorough!!
You are welcome! I hope the Country Hittys might find some useful hints here. I am quite sure they would love a little hand made bed!