Cobbled together

Sock feet are no good for a Prince who wants to go out and play.
Tamino needed shoes before he could go out to play!
I’ve created a gallery so you can see how I made his shoes…at the end of the gallery, I will explain what I’d do differently next time! Click any image to see a larger view, and then use the arrows to navigate back and forth within the gallery.
.
.
-
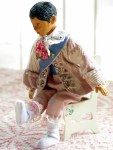
- Sock feet are no good for a Prince who wants to go out and play.
-
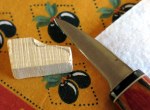
- To be sure Tamino ended up with shoes the right shape, a Cobbler’s Last was carved out of a scrap of chestnut wood.
-

- Carved Last is the same size as Tamino’s sock-feet
-
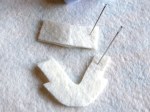
- Vamp and Heel inner shoe layer made out of bamboo felt
-

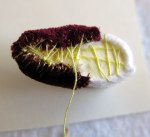
- Velvet outer fabric is pinned in place, stitched into the shape I wanted, and then the excess cut away.
-
- Embroidery on the velvet. The velvet does not extend to the edges of the white bamboo felt at the bottom where it will tuck under the sole of the shoe, nor at the back of the shoe vamp piece, where it will be covered by the heel piece of the shoe. This was done to reduce bulk in the finished shoe. I am sorry I don’t have a good picture illustrating this, but you can see what I mean in some of the pictures later in the process.
-
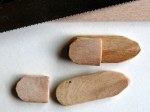
- For the sole of the shoe, a Popsicle stick was sawn into the doll’s foot-length plus a smidgen, then carved into shape. I’ve also made a heel from another short length of Popsicle stick.
-

- Heels are glued to the soles with wood glue, and clamped with a clothes pin
-
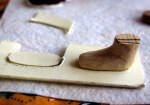
- Cardboard insoles are made by tracing round the Last onto card
-

- The uncovered part of the toe of the shoe is stitched around the last.
-

- The cardboard insole is placed in position on top of the upside-down Last
-
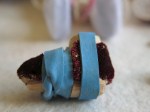
- I laced the vamp across the insole, and tightened it into shape. The heel part of the shoe was attached in the same way.
-

- I have covered the bottom of the insole with glue, tucking glue under the turned edges with a toothpick.
-

- The wooden sole is added to the gluey sole of the shoe
-
- Clamped with elastic band and left for 30 minutes, after which the last should easily slide out.
-
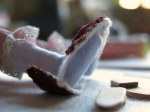
- I first threaded ribbons through the fronts of the shoe’s heel piece, and tied them onto Tamino’s feet. Ribbons are pretty, but Tamino complained…he doesn’t want to trip when chasing dragons!
-

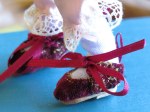
- Shoe edges were trimmed flat, and edged with gold twist cord.
-

- Prince’s eye view of the final shoes
-

- Watch out, Dragons!
.
.

Watch out, Dragons!
…Tamino is ready to chase some dragons!
Next time I would not do a separate shoe piece to wrap around the heel of the foot… it was very fiddly and just added bulk.
To stiffen the whole shoe after it was finished, I wrapped the last in cling film, and then spread cyanoacrylate (super glue) onto the film around where it would contact the shoe. Then I replaced the shoe onto the last for a few minutes until the adhesive dried. When the last is pulled out, the cling film comes with it, and the little shoe is stiff enough to just slip onto Tamino’s foot.
.
.
.
.


Ingenious and dashing!
Thanks very much, I just hope Tamino’s shoes don’t come off while he is dashing around!
you are amazing and the Prince is a lucky lad.
Thanks very much – He is glad to be entirely and respectably clothed at last!
You are amazing…Who would have ever thought that a popsicle stick could be parlayed into Royal Footwear.
I showed Julie this tutorial and she wants to try to make our boy “Jules” shoes. You make things look achievable but I know that a lot of practice and patience goes into all these wonderful clothes.
Tamino is so handsome.
Oh, Hooray!
I always hope someone is having some fun with the tutorials. I learned a lot just by doing, and undoing! Practice and patience is the story of my life!
Well now THOSE are some shoes!!! So elaborate and so perfect for your young prince! He is a vision.
He appears to be quite satisfied with them, especially the gold embroidery (though I suspect you would have made that more elegant!)
Yes, Tamino is a vision. Cobbling sounds rustic (which I love)…I think I would like to call what you did Mastery…although you may not be practiced in shoe making, you have created a masterful work in total on Tamino. Your last photo of him is just sumptuous. You are so inspiring and a blessing to us who appreciate (and use) your tutorials. Many thanks once again.
I am glad you said so – it has been fun pulling it all together…and I am very glad if the tutorials are useful…I love that all the Hittys in this household are patient with my experimenting, and pleased with the results!
Excellent work! I have an older brother who loves children’s shoes because of their tiny size. These would put him over the moon! I will have to send him a link to this tutorial. Prince Tomino is devine!
These were tiny alright! They were my first successful doll shoes, so the were a bit of an experiment….Let me know if your brother makes some!